While the AIF convoy was crossing the Indian Ocean, Colonel H. G. Chauvel, the Australian representative at the War Office, and the High Commissioner in London, Sir George Reid, arranged with the British Secretary of State for War, Field Marshal Lord Kitchener, for its diversion to Egypt.1 Egypt had advantages over England as a training area. The milder climate permitted training to be carried out all day and every day, whereas in the 123 days that the Canadians spent training in England it rained on 89, causing training to be disrupted or cancelled.2 Nor was there the competition for training areas or restrictions on their use in Egypt. Furthermore, accommodation on the Salisbury Plain was at a premium and it was clear that sufficient hutment would not be available for winter. Wintering in tents in Egypt was a much more pleasant prospect.
The strategic situation there had been changed by Britain's declaration of war on the Ottoman (or Turkish) Empire on 2 November 1914. Though nominally still part of the Ottoman Empire, Egypt had been occupied by the British since 1882. The Australians were deployed around Cairo in case there was trouble. Despite or perhaps because of all the precautions there was no disturbance in Egypt.3
Most of the Australians in Egypt soon became part of the Australian and New Zealand Army Corps (ANZAC) under the command of Lieutenant General Sir W. R. Birdwood. Corps headquarters was a British unit consisting of only 10 officers and 10 other ranks that Birdwood had formed in India and brought with him from Bombay on 12 December 1914.4 The headquarters was incomplete, and Birdwood particularly felt the lack of an artillery officer, noting that:
Both Australian and New Zealand artillery are very backward indeed and need all the help they can get. 5
Nonetheless, this request remained outstanding until 5 February 1915, when Colonel C. Cunliffe Owen was appointed. 6
Birdwood created a second division, the New Zealand and Australian Division, under the command of Major General Sir A. J. Godley, from the New Zealanders, 1st Light Horse and 4th Infantry Brigades. This was intended as a temporary arrangement pending the creation of full strength infantry and mounted divisions.7
There was a difference in training between the two divisions. Major General W. T. Bridges of the 1st Division concentrated on small unit tactics, with battalion and brigade exercises beginning in February, and he never did get around to exercising his division as such whereas Godley immediately started division exercises. Infantry training generally involved route marches through the soft sand in full kit, entrenching and advancing by rushes. Units practiced staged withdrawals and night attacks.
Although Bridges toyed with modifications to the division's organisation tables for a campaign in the Middle East, there was only one change at this time. Infantry battalions were reorganised on 29 December 1914.8 Their size was unchanged but now there were four platoons per company and only four companies per battalion instead of eight. This change had been made in the British Army just before the war and brought it into line with continental armies. The AIF had been formed on the old establishment because the modern textbooks were not available in Australia.9 That the platoon was a better tactical unit than the company and the new organisation superior to the old was not yet apparent, as tactics remained battalion based.
Many wars have been fought for possession of the Straits of �anakkale (also known as the Dardanelles and the Hellespont), including the famous Trojan War (1194-1184 BC).10 In 1915, the straits had been fortified with guns, minefields and searchlights and an attempt by a British and French fleet to force the straits on 18 March 1915 met serious defeat with three ships sunk and three damaged by mines and shore batteries. The newly appointed Commander in Chief of the British Mediterranean Expeditionary Force (MEF), General Sir Ian Hamilton, was requested to devise a land campaign to capture the straits.11
The beaches of the Gallipoli Peninsula are well suited to amphibious operations, perhaps the most tactically and technically complex of military operations. There are no tides in the Aegean and no current off the west coast of the peninsula although the one in the straits affects the beaches around Cape Helles. The grade of the beaches is steep enough for boats to beach close to the shoreline. They were, however, poorly surveyed so some risk of encountering shoal water or submerged rocks had to be accepted. The only available map of the Peninsula was so full of errors that it caused serious difficulties both ashore and afloat. Aerial photography was still in its infancy but efforts began on 4 April 1915 and gradually maps were assembled from hundreds of aerial photographs.12 Thus, while the topographical information was poor, the military information was often surprisingly accurate.13 They revealed that all beaches on the peninsula south of Gaba Tepe had extensive belts of barbed wire along the water's edge and some below the waterline as well. Some of the Cape Helles beaches were also mined.14 Not until 19 May 1915, when the Australians obtained an excellent recently issued large scale Turkish map from a mortally wounded Turkish officer and copies were made in Egypt was a reliable map available.15
Studying the situation prior to Hamilton's arrival, the French General Albert d'Amade and his staff considered the Asiatic shore to be the best option.16 There are good beaches and by creating space through forcing the dispersion of fighting men over a broad front, mobility would have become theoretically possible. Hamilton was against the idea because his forces did not have sufficient motor or animal transport to undertake the advance, the Asiatic side dominates the straits but not the Gallipoli Peninsula and the War Office and Admiralty had agreed on the peninsula.17 Hamilton therefore sought battle with the enemy. This may seem unsound but it was in accord with two key memes; the meme that numbers were less important than morale and the meme that the decisive battle was the central and desirable objective of the campaign.
The enemy commander, General Liman von Sanders, concentrated the majority of his troops inland, holding the beaches thinly. The idea that concentrated reserves and a vigorous counterattack was the best possible form of defence was German doctrine but it seriously underestimated the superiority of a defensive posture. The best chance of destroying a landing was at the water's edge. The guns of the navy would have had little effect against entrenched positions, reserves could have come up from other beaches fairly easily and once entrenched themselves the allies would be hard to shift.18
Hamilton was aware that the Royal Navy had developed landing craft for a proposed Baltic Sea operation that were armoured, had a shallow draft for beaching, were large enough to carry five hundred men and were propelled by their own engines. He requested that 20 to 30 be sent out but none arrived in time to take part in the landings.19 Instead, the ANZAC troops were landed at Gaba Tepe by 12 tows, each consisting of a picket boat, a steam launch or pinnace, a cutter and a lifeboat, and capable of carrying 120-160 men.20 The troops used rope Jacob's ladders to board them. The steam launch would carry them as close to shore as possible; the cutters would row from there. There was not enough craft to land more than two divisions and subsequent waves would have to reuse the same boats.21 Rehearsals of the landing were carried out on Lemnos from 15 to 18 April. 22
Without landing ships, ocean going vessels that could have been laden in Alexandria, sailed direct to the Peninsula and discharged directly over the beaches, supplies had to be unloaded at Mudros and transshipped to the Peninsula in smaller vessels of 1,500 tons or less as there were no deep water berths for full sized ships on the Peninsula. There was one attempt to improvise a landing ship. A collier, the River Clyde, which could carry 2,000 men and drew only 2 metres of water empty, was converted into a landing ship by cutting openings in its sides and adding gangplanks. Eleven Maxim guns were mounted in the bow behind steel plates and sandbags - which turned out to be the difference between victory and defeat on a beach at Cape Helles rightly considered a deathtrap. River Clyde also served as a small arms ammunition depot, water condensing plant, dressing station and a breakwater.23 The lack of landing ships forced the first waves of ANZAC at Gaba Tepe to use warships to carry the tows, the first wave being carried in battleships and the second wave in destroyers. Subsequent waves were carried in transports.
Strength of the Mediterranean Expeditionary Force(April 1915) 24 |
|||||
| Port | Ships | Personnel | Animals | Vehicles | |
| 29th Division | Alexandria | 15 |
17,649 |
3,962 |
692 |
| ANZAC | Alexandria | 30 |
25,784 |
6,920 |
1,271 |
| ANZAC | Mudros | 5 |
4,854 |
698 |
147 |
| French | Alexandria | 22 |
16,762 |
3,511 |
647 |
| Royal Naval Division | Port Said | 12 |
10,007 |
1,390 |
347 |
| TOTAL | 84 |
75,056 |
16,481 |
3,104 |
|
Hamilton decided to make his main landing at five beaches around Cape Helles with the British 29th Division. Because the beaches there were so constricted it was estimated that it would take two and a half days to disembark the entire division. ANZAC would land north of Gaba Tepe while the French made a diversionary landing at Kum Kale and the Royal Navy Division a faint at Bulair. The total strength of the MEF was about 75,000 men, somewhat less than the enemy. Hamilton intended to defeat the enemy in detail but the scattered nature of his landings made the reverse seem more likely.
Landings at Helles could be supported by land based air from Tenedos but Gaba Tepe was out of their effective range. Air cover for the operation was a naval responsibility. The navy sent the British 3rd Naval Air Squadron under Commander Samson. This squadron possessed 18 aircraft but only two BE2s and three Maurice Farmans were suitable for bombing and spotting work. Ark Royal's crew cleared a vineyard on Tenedos to create a 600 metre long airstrip and anti-aircraft guns were emplaced around it. Samson estimated that the campaign would require a minimum of 30 good two seaters and 24 fighters. "So equipped", noted Hamilton, "he reckons he could take the Peninsula by himself and save us all a vast lot of trouble".25 This would later prove to be utterly improbable but even at this stage of the war aircraft had an aura of deus ex machina that certain new technologies attract from their enthusiasts. This phenomenon is partially a symptom of the enthusiasm of the convert, without which they would probably give up in the face of inevitable early setbacks, and partially a reaction to the sceptics.
The submarine threat soon forced Ark Royal to return to Kephalos where she served as an aircraft depot ship. On 12 June 1915 a newer, faster carrier, the Ben-My-Chree arrived, carrying two scout and three Short seaplanes. The Shorts were equipped as torpedo bombers and on 12 August 1915 a 5,000 tonne supply ship became the first victim of an aerial torpedo. During the Gallipoli campaign, seventy air attacks were made on enemy shipping, including five with torpedoes, and 1,155 bombs, weighing 27 tonnes, were dropped.26
On 4 March 1915, Birdwood asked Kitchener for a kite balloon, the use of which was proposed in the Field Service Regulations.27 The kite balloon had been developed by a pair of German pioneers, August von Parseval and Bartsch von Sigsfield, in the 1890s. Earlier tethered (or captive) balloons had proved inoperable when the wind was blowing because the car would rock violently. Von Parseval and von Sigsfield used air pressure to stabilise the balloon by inclining it at 30 to 40 degrees into the wind. An air sack at the rear acted as a rudder and kept the balloon pointed into the wind. It could be used at heights of up to 1,000 metres and in a 65 kph wind. A kite balloon had considerable advantages over an airplane in 1915: it could remain aloft all day, communication with the mother ship was continuous and reliable, and the observer could devote all his time to spotting. The drawback was the vulnerability of a hydrogen balloon, especially to air attack.28 The tramp steamer Manica was taken up from carrying manure on the Manchester Canal and outfitted with a kite balloon. The experiment was so successful that the Admiralty ordered six more ships to be similarly fitted out and on 9 July 1915 a second kite balloon ship, the Hector, joined the campaign. A third, the Canning, replaced Manica in October.29 Hamilton placed great faith in the ability of naval guns to clear the way for his men, faith not justified by their performance thus far in the campaign.30
Birdwood favoured landing at night and dispensing with a preliminary bombardment. As it turned out, the beach defences were so weak that it would have been useless, and the landing was at dawn due to the postponement to 25 April 1915 which meant a later moonset.31 The 3rd Infantry Brigade landed 1.5 kilometres north of the intended site.32 Given the confusion that inevitably results from any landing, especially one on the wrong beach, things went ahead relentlessly, ship to shore movement and unloading being controlled by a naval beach party, as per British doctrine.33 Turnaround time of the tows was slower than anticipated. The principle cause of delay was enemy fire from Turkish field guns behind Gaba Tepe. The Navy attempted to silence them but they continued to fire and seaplanes were unable to locate them because they were too well concealed and withheld their fire when seaplanes came near. Birdwood accordingly asked for them to fly up and down the lines, suppressing the Turkish fire that way.34
There is a legend that the Australians pushed "too far, too fast". On the contrary, they did not push far enough nor fast enough. The terrain over which ANZAC had to pass was indeed formidable, but not impassible in the time allowed. Still, only the fastest moving parties made it to the Third Ridge ahead of the Turks. Much of the credit for this has to be given to the Turks, who made good use of entrenchments, concealment and the terrain. They did not lose cohesion in the close country and in this battle proved themselves more than a match for the Australians. Repeatedly the Australians occupied key positions like Baby 700 only to be driven off by Turkish fire. Some of this was from Turkish machine guns and artillery overlooking their positions, but Turkish infantry working their way around exposed flanks and picking off the defenders with rifle fire played an important part.35
Many of the tactical errors the Australians made could be traced to their training: the mistaken idea from the Field Service Regulations that the enemy mined his own trenches,36 the leaving of picks and shovels behind on the beach and the occupation of crests rather than reverse slopes.37 The need for concealment was learnt from the Turks, who concealed their machine guns well and were quick to locate the Australian guns. Discipline was good; men followed their officers and random firing was not in evidence during the day.38 Initiative was less in evidence. Too many units without orders did nothing. An early start on digging in would have helped greatly at positions like Lone Pine that could have been held but were not.39
Given that nowhere had the day's objectives been achieved, there was practically no chance of capturing them with the troops available, no substantial reinforcements could be expected and a major Turkish counterattack was probable, Bridges and Godley recommended withdrawal. Advised by the navy that evacuation would be impossible owing to losses in small craft and the dispersal of transports due to shellfire, Hamilton ordered them to dig in and hold their small beachhead.40 The rugged terrain now became their friend. In particular, in Anzac Cove they had the only beach on the coast not under direct Turkish observation, although the southern tip is visible from Suvla and the tip of Ari Burnu is visible from Gaba Tepe.41 Anzac Cove was also blessed with an excellent grade, and boats drawing 1.5 metres could approach to within 10 metres of the shore for most of its extent.42
The first step in carrying out Hamilton's directive was the digging of individual weapon pits or foxholes during the night. These were later joined up to form a continuous trench line. The quickest way to dig a trench is by entrenching, in which a line of men with spades dig simultaneously, but it requires access to the surface. In more dangerous localities, trenches were initially dug by the slower but safer process of sapping, in which the trench is dug below ground level by extending a sap. Tunnelling was a new technic developed by the 12th Infantry Battalion in late April to connect foxholes, in which a trench is dug just below the surface. It is even safer than sapping because the enemy is unaware that anything is afoot until the work is complete and it suddenly breaks the surface. From 6 June 1915, ANZAC extended all its trench systems in this manner.
Trenches were dug deep enough that soldiers could stand without their heads appearing above ground and with traverses interposed so that the enemy could not fire straight down the trench. Spoil, loose or in sandbags, was used to build up the front on the trench (the parapet) and the back (the parados). Some trenches were deliberately built without parapet or parados to conceal their location from the enemy. Because a trench was deeper than a man was tall, fire steps were provided for men to stand on in order to fire over the parapet. Standing orders required six men for every twelve metres of trench.43 The trenches at Quinn's Post, the most dangerous point of the whole line where the Turks were in places only 15 metres away were, on Birdwood's order, deliberately left shallow so that the defenders could man the parapet in an instant, which was found to be an error. A trench from which men shoot is called a fire trench. Other trenches, known as communications trenches, led to the rear. The soil at Gallipoli is sandy and once the scrub is cleared away it is easy to shift with an entrenching tool, the small combination pick and shovel issued to every man. Initially the Australians tried to get as close to the Turks as possible but the disadvantages of this were realised and a line at Lone Pine 30 metres from the enemy trenches was turned into a barbed wire trap.44
From this it is but a short step to mining, a classical form of siege warfare in which the attacker attempts to destroy the defender's position from below. This form of warfare only becomes possible when the front line moves slower than a man can dig. Initially, Australian mining was limited to listening holes owing to shortages of timber and iron. On 29 May, the Turks blew up part of Quinn's Post, killing all the men in part of the front trench and the miners in a nearby tunnel. They occupied part of the post and were only driven out after a furious five hour bomb fight.45 This incident gave considerable impetus to Australian mining efforts and Birdwood ordered special mining units to be formed from 200 men with mining experience in civilian life. These men immediately set to work and their skill slowly turned the tables in the underground war. Working round the clock in eight hour shifts they constructed a series of defensive tunnels. Sappers or skilled miners worked singly or in pairs at the mine face with picks and entrenching tools while others hauled away the spoil in sand bags. Depending on the soil, a standard two metre high, one metre wide tunnel could be driven forward five to seven metres per day. Other men were engaged in listening. Three experienced miners per brigade determined the location and direction of enemy mining activity from the sound of their digging. Camouflets (counteroffensive mines) were exploded to destroy the enemy mines approaching Quinn's Post and on 24 June the miners exploded their first offensive mine. On 29 June, the Turks employed a device that emulated the sounds of digging to disguise their tamping of a mine and killed two listeners, but the listeners soon learned to distinguish this from true digging. The underground war continued without let up to the very end of the campaign, which concluded with the firing of 16 mines, each charged with between a quarter of a tonne and 3 tonnes of explosive. Long before, the miners had gained a complete ascendancy over their Turkish opponents.46
Guns Available to ANZACMay - November 191547 |
|||
| Gun | 1 May 1915 | 15 July 1915 | 1 November 1915 |
| 3 pounder AA | 2 |
||
| 10 pounder | 12 |
12 |
12 |
| 12 pounder AA | 1 |
||
| 18 pounder | 28 |
28 |
52 |
| 4 inch gun | 2 |
||
| 4.7 inch gun | 1 |
1 |
|
| 4.5 inch howitzer | 4 |
4 |
8 |
| 5 inch howitzer | 20 |
20 |
|
| 6 inch howitzer | 3 |
7 |
|
| TOTAL | 44 |
68 |
105 |
To damage the enemy's trenches, the infantry turned to the artillery but perhaps no branch found the conditions at Anzac more frustrating. First of all, ANZAC was short of guns. The two divisions had just five Australian and two New Zealand 18 pounder batteries and one New Zealand 4.5 inch howitzer battery between them, as five Australian batteries had been diverted to Helles where they spent the next few months supporting the British.48 On 24 June these guns became the first Australian artillery to fire directed by aircraft.49 Corps artillery consisted of two Indian mountain batteries, each equipped with six 10-pounder mountain guns. ANZAC therefore had only 44 barrels.50
ANZAC was short of ammunition because the supply had not been calculated on the basis of a prolonged campaign. By May Hamilton was down to his last few thousand rounds of 18 pounder ammunition and was anxiously negotiating with the War office for resupply to be sent from Marseilles instead of England. On 20 May he limited the normal daily expenditure to 2 rounds per gun per day. Initially, the only available ammunition was shrapnel. The first high explosive shells reached Anzac on 20 June in small quantities and by 2 August, 150 high explosive rounds were provided per 18-pounder battery.51 Without them, the artillery could not damage enemy entrenchments.
Keeping the guns working was a challenge, for replacement guns and spare parts were both in short supply. Repair crews often resorted to "cannibalism" - the practice of taking spare parts from one gun to repair another.52
Another problem was the terrain. The rugged terrain made it hard to move guns around the beachhead and the flat trajectory of the 18 pounders made them doubly hard to site. The guns simply had difficulty clearing the crests of the ridges. Moreover, because the Turks were often just on the other side of the ridge, the shrapnel shells exploded forwards or even upwards instead of downwards, much reducing their effect. The howitzers too had difficulties because the target was so near the top of a gun or howitzer's arc of fire that their shells did not have the momentum to explode on impact.
By no means the least of the artillery's problems was the Turkish artillery, which put top priority on engaging its opposition. Any exposed gun position drew prompt and accurate artillery fire. For cases where guns had to be exposed for one reason or another, the guns of another battery would provided cover by keeping an eye on the Turkish battery from which counterbattery fire was expected, opening on it if it replied. Some batteries kept a gun loaded, manned and trained on the Turkish position that was their responsibility round the clock.53
By May the mountain batteries were positioned on high but "dead" ground – ground that cannot be observed by the enemy, thus denying them location, and as such was prime real estate at Anzac. Gradually, as the field engineers constructed gun positions and roads, it became possible for 18 pounders to join the mountain guns. Field artillery brigades became responsible for that part of the line immediately in front of their positions, locating their headquarters near the infantry brigades holding their sector. This was in conformity with the Australian prewar practice by which field artillery brigades were assigned to infantry brigades.
To the infantry, the failure of the guns to halt construction of Turkish earthworks was baffling. On 5 May, Bridges had two guns of the 8th Field Artillery Battery hauled up the front line to fire at the Turkish trenches like giant shotguns. The operation was repeated twice the next day but only proved that shrapnel had no effect on earthworks and was only dangerous to the defenders if fired along the trench line rather than at it. This was precisely what a Turkish gun was doing to the Australian trenches at Lone Pine and it was in the effort to suppress it that the ultimate solution was discovered. A New Zealand forward observer on Russell’s Top located the gun. The New Zealand howitzers beneath Ari Burnu found they could range on the gun, but had insufficient ammunition to suppress it. The New Zealand 1st Field Artillery Battery and Indian 26th Mountain Battery moved up to Russell's Top and were able to silence it temporarily from there.54
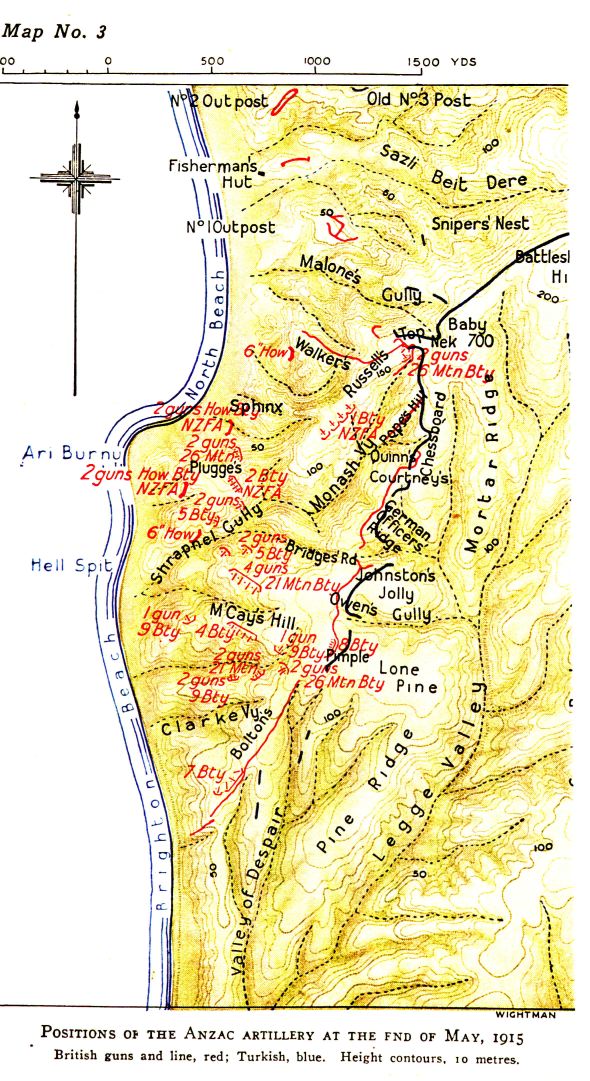
Thus it was realised that the answer was for the guns of the 1st Division to support the troops of the New Zealand and Australian Division and vice-versa. This seemingly simple idea involved a complete revision of the corps command and control arrangements.55 The signallers set to work splicing the two communications nets together and ultimately constructed a communications net from signal cable that came to connect every post. As the cables were largely unburied, much of their campaign was spent repairing breaks.
Command proved a more difficult problem. The man who could have resolved it by establishing a centralised artillery command, the Corps Artillery Commander, Brigadier General C. Cunliffe Owen, made no attempt to do so. Widely regarded as a dud round, Cunliffe Owen left coordination up to the divisional artillery staffs. The problem was British doctrine that called for artillery to be controlled at the divisional or brigade level. No thought had been given to control at corps level and it was unclear whether the corps artillery officer was meant to command the artillery or was simply an adviser to the corps commander, a problem shared by the engineer and medical officers. The result was excessive delays in responding to fire calls. On one occasion a request for artillery fire on a Turkish working party took overnight to reach the appropriate forward observer.56
Fortunately, the Turks shared a problem with the British: a critical shortage of artillery ammunition, particularly high explosive. Ammunition quality was also a problem and there was a high percentage of dud rounds. Turkey was physically isolated from Germany by neutral countries, which would not allow the carriage of ammunition across their borders. Turkish artillery ammunition therefore came from factories in Istanbul, which even with German assistance, could not deliver the required ammunition in the quantity or quality required.57 This fact was duly discovered by the codebreakers and made known to senior British commanders.58
Had the Turks had ample ammunition, Anzac could have been rendered untenable by shelling Anzac Cove. Their first attempts to shell the beach foundered on the angle required to clear the ridges and still hit the beach. Shells either landed out to sea or struck Plugge's Plateau, while high shrapnel bursts had little effect, piles of boxes containing rations, ammunition and stores, and bales of fodder providing sufficient protection for men and animals to continue working under fire. The solution was to avoid the ridges entirely by firing from the south. On 6 May, "Beachy Bill" began shelling the beach. A dud round retrieved from the beach was found to have its fuze set for 5900 metres, which placed the gun that fired it in the olive (actually oak) grove south of Asmak Dere. Artillery and naval guns continually attempted to silence them but the Olive Grove guns continued to fire daily for the rest of the campaign, causing over 1000 casualties on the beach alone, which became one of the most dangerous places. They were not averse to firing on small craft operating off the beach either, often sinking trawlers and barges. The Turks' biggest mistake was in not concentrating all their scarce ammunition on the beach, where every round was bound to hit something.59
On 14 July 1915 the 1st Heavy Artillery Battery was formed with two old 6 inch howitzers and a 4.7 inch naval gun.60 These guns represented a considerable increase in firepower. The 4.7 inch gun could lob a 20 kg shell 10,000 metres - almost twice as far as an 18 pounder.61 Within days the battery was answering the fire of the Olive Grove guns. By the end of the campaign, the two 6 inch guns had fired 1,726 rounds and the 4.7 inch gun, 513 - a total of 2,239 rounds or 14.8 per day on average, much of it at the Olive Grove guns.62
Artillery did not dominate the Gallipoli battlefield. Shortages of ammunition severely cramped the style of gunners on both sides. The Australian artillery learned the importance of camouflage; the value of counterbattery fire; the use of aerial observation; the relative merits of high explosive and shrapnel; and, most important of all, the need for centralised command and control of the guns. Artillery landed as an adjunct to the infantry and left as an independent arm. But there were still many technical and tactical problems yet to be solved. The artillery's war within a war at Anzac had been a draw, with neither side curtailing the guns of the other.
A similar situation prevailed in the air. Enemy air activity was slight throughout the campaign but with such a small beachhead any enemy observation was dangerous and liable to bring down accurate fire from Turkish artillery and naval guns. Since ANZAC had no antiaircraft guns at first, special emplacements were constructed to allow 18 pounders to shoot at aircraft. The method was simple: a hole was dug in the ground and the trail of the gun lowered into it so the muzzle pointed up in the air. In late August three 3 pounder Hotchkiss antiaircraft guns arrived. All the manuals were in Japanese but a Japanese speaking digger was found to translate the manuals and produce range tables.63
After being buzzed by a low flying German airplane on 9 September 1915, Godley fired off a request to Hamilton for aircraft and guns to defend Anzac from aerial interlopers. Hamilton had no aircraft to spare but did send a 12 pounder naval antiaircraft gun. A coordinated antiaircraft defence with machine guns was organised. Each of the four divisions then holding the line around Anzac Cove designated two machine guns for antiaircraft use, emplacing them so as to cover the entire position.64 Despite the effort, no enemy aircraft were shot down by antiaircraft fire over Anzac.
This was not a unique occurrence of established technologies being turned to a different purpose. The failure of the technologies with which they were equipped soon led to a search for new technologies and reevaluation of old ones. The ability of the Australians to obtain them at Gallipoli was limited, however.
The hand grenade was unfamiliar to Australian soldiers although its use in siege warfare was recommended in the Field Service Regulations where it warned that hand grenades should only be given to troops trained in their use.65 The first experience for many was from the enemy who were equipped with iron German fragmentation grenades. These were also the first hand grenades used by the Australians. On 30 April 1915, in response to an urgent request from Quinn's Post for hand grenades, the chief engineer of the 1st Division brought up some captured grenades. Three were thrown but the results were disappointing in that they did not deter the enemy from tunnelling and sapping.66 The Australians found themselves the targets of bombing to which they could not retaliate in kind, which is the worst possible tactical situation. They were often forced to remain silent in their positions since any noise could attract a Turkish bomb. The bombing not only caused casualties but damage to the trench system itself. If a bomb landed in a trench the men could clear the trench, if there was time. They could try throwing the bomb back if they were quick enough but the Turks could retaliate by shortening their fuses. Alternatively, they could try to smother the explosion with a great coat or partly filled sandbag. This method proved quite successful but was still dangerous. It was possible only because the early bombs contained insufficient explosive, the technology still being in the trial and error stage. Later bombs could not be smothered in this way. Eventually, wire mesh screens were erected on wooden frames in front of the trenches most susceptible to enemy bombing.67
Sappers of the 2nd and 3rd Field Companies began manufacturing bombs on the beach around the end of April.68 The famous "jam tin" bomb consisted of an empty tin can filled with guncotton and a few pebbles or enemy shrapnel balls; a detonator was inserted and a fuse attached. A bomb factory was established there and by July it was producing over 200 bombs daily, rising to 4,000 per day in August.69
Another type of bomb made on the beach was the Lotbini�re or "hairbrush" bomb. This consisted of a wooden paddle the size of a rounders bat with a slab of guncotton with wire fastened to the flat part of the paddle, with a primer, detonator and fuse attached. This weapon was developed in response to a need for a more powerful device to destroy trenches, and was probably inspired by the damage done to the crude trenches at Quinn's Post by bombs, but the destruction of the timbered Turkish trench lines by this means proved impractical.70
By August, both types of bombs were manufactured in Alexandria and Malta in quantities sufficient to cause the British War Office to protest that supplying the materials for grenades to these places was hindering the manufacture of bona fide hand grenades. In return for an end to their manufacture at these places, the War Office promised to ship Hamilton 30,000 to 40,000 grenades weekly.71 But manufacture on the beach at Anzac Cove continued to the end of the campaign.
The first Jam Tin bombs to reach Quinn's Post were a pair brought up by Major Quinn himself on 7 May. One was thrown that night, and it was Jam Tin bombs in quantity that allowed the Anzacs to turn the tide against the Turkish bombers. On 13 June, the New Zealanders (who had relieved the Australians at Quinn's) threw 170 bombs and 212 more the next day. Soon 300 or more was not unusual and eventually bombing rendered enemy bombing positions untenable, earning Quinn's Post its Turkish name, Bomba Sirt (Bomb Spur) in the process.72
Another rediscovered technology was the mortar. The close proximity of the ANZAC and Turkish positions in several places made ideal targets for mortars - small, muzzle-loading artillery pieces that fire at high trajectories. Neither the British nor the Turkish Armies had any in 1914, mortars having disappeared from the arsenals long before. The first Turkish mortars deployed were literally museum pieces over fifty years old with designs dating back to the 18th century and which fired a large iron shell. In July the Turks also began using improvised rockets but fortunately they were never supplied with an effective mortar during the Gallipoli Campaign.73
Most of the mortars supplied to the Anzacs were of a crude type known as the "Garland", which first appeared on 12 May. The Garland consisted of little more than a length of tubing that had to be propped up to the required angle. The bombs were a variant of the jam tin grenades with bags of black gunpowder for propellent.74 A better type arrived on 20 May, 75 four Japanese trench mortars, two per division. This type fired a high explosive bomb 10cm in diameter, weighing about 14 kg and with a metal rod attached that was inserted into the barrel while the bomb rested outside. This type of mortar is known as a spigot mortar. The bombs had a considerable effect on the Turks, causing casualties whether they exploded in the air or on the ground, one causing 80 casualties. They also had some success driving away nearby Turkish artillery such as the Lone Pine Gun. As a countermeasure, the Turks roofed over their trenches in the forward zone with timber. Unfortunately, their use became strictly rationed by ANZAC when it was discovered that the total supply of bombs was just 2,000 and that any further numbers would have to be specially manufactured in Japan.76 A small number of 3.7 inch light mortars were acquired later in the campaign. On 2 October, the 1st Division had seven Garlands, one 3.7 inch and two Japanese trench mortars with 6460, 200 and zero rounds of ammunition respectively.77
Terrain, rifle and machine gun defined trench warfare conditions at Anzac. The three northernmost positions on the Second Ridge - Quinn's, Courtney's and Steele's Posts - occupied spurs on the far side of Monash Valley. Supplies had to travel up Monash Valley, the western side of which was under Turkish observation from Baby 700 while the Turks could also view the slopes below Quinn's Post. The position was far from ideal; it had little depth and internal communications were under enemy observation. Attempts to improve it by capturing Turkish posts were bloodily repulsed.
The security of Quinn's Post depended not so much on its garrison as on the overwhelming firepower of the 20 or more enfilading machine guns at nearby posts. Machine guns were arranged so that its neighbours protected each post. The arrival of light horse regiments, machine gun sections first, almost doubled the number of guns available. A practice became established whereby units would share a post. Units on Pope's Hill relieved each other on a weekly basis, and those on Quinn's Post and Lone Pine every 48 hours.78 The machine guns would remain in the line and each regiment and battalion doubled the size of its machine gun section, although the number of guns was not immediately increased. Due to the restricted space available around Anzac Cove, training of new gunners was undertaken in gullies behind the front lines.79 The massing of machine guns was frowned on by the Field Service Regulations, which said that massed machine guns would only attract hostile artillery fire.80
The conditions provided an ideal opportunity for snipers. Initially the snipers concentrated on the frontline posts. Fatigue parties working in Monash Valley carrying water, ammunition and rations up the dry creek bed that served as a road at first ignored the snipers, who nonetheless killed or wounded a few of them each day. But as the situation settled into trench warfare, targets became scarce up front and the snipers switched their attention to them. By early May they were losing twenty to thirty men a day. The 2nd Field Company constructed a series of traverses of sandbags and sand filled boxes 1.5 metres thick, alternately on the left and right side of the Valley. Stretches between were camouflaged with brushwood hanging from wires, but the route was still very dangerous. On 15 May, a sniper shot Major General Bridges in Monash Valley, severing his femoral artery and vein. Despite prompt first aid he died on board the hospital ship Gascon on 18 May. On 19 May, Private J.S. Kirkpatrick of the 3rd Field Ambulance, better known as "Simpson", was shot at the same place and killed instantly.81
A communication trench was dug the length of the valley but even before it was complete, another solution to the problem was at hand. Colonel H. G. Chauvel organised the snipers in Monash Valley. Working in pairs with an observer who watched an assigned sector with a telescope and a sniper who lay nearby with his rifle, the snipers achieved a complete ascendancy over their Turkish counterparts. One sniper, Private W. E. Sing, was credited with shooting 250 Turks.82 The enemy snipers became quiet, resorting to blind harassing fire at night, when they could not be located.
In the final months of the campaign the ANZAC snipers were provided with two more technologies that made them even deadlier: the telescope rifle and the silencer. The former increased their already high accuracy, while the latter made it more difficult for the Turk to spot a sniper. A local invention was the Wallaby sniping cage, a device for locking a rifle in place. Once a sniper had fired a shot into a fixed target like a loophole, he could lock the rifle in place and then fire another shot at the exact same spot, without taking aim.83
The sniper problem led to another device being produced locally, the periscope. The need for this device became apparent early, the original method of observing the enemy's lines by raising one's head over the parapet proving extremely dangerous. The 2nd Field Company began making periscopes on 27 April and, by the end of May, over 3,000 had been produced.84 The periscopes were very simple: two pieces of mirror on a piece of wood.85 The top one would he held above the parapet and the observer could watch through the bottom one.
Loss and breakage rates were high because the periscopes themselves became targets for snipers. In July the 1st Division was losing 30 periscopes a day and division headquarters appealed for the return of wooden parts of damaged periscopes.86 The men learned not to expose them for more than a few seconds as this could result not only in the loss of the periscope but serious eye injuries from glass splinters.87 On 14 May, Birdwood himself was struck by a bullet while looking through a periscope and knocked senseless.88 Once Jam Tin bombs became plentiful, the Australians started responding to a periscope with a bomb, a practice that ended the use of Turkish periscopes within bombing range.
The Turks tried to avoid location by camouflaging the periscopes to look like part of the sandbag parapet but it did not fool the snipers. They tried smaller mirrors and mirrors on slender sticks to prevent acquisition, but hit they still were. Metal casings failed to stop destruction of the periscope. Fake periscopes had more success. This stratagem involved getting the snipers to shoot at a fake while a real periscope elsewhere located the snipers, who soon learned to leave the decoys alone.89
A further refinement, the periscope rifle, was invented by Lance Corporal W.C.B. Beech of the 2nd Infantry Battalion. A staff officer from division headquarters, Major T.A. Blamey, saw one in use on 19 May near Lone Pine, was impressed by its potential, and had Beech set up a factory on the beach to manufacture periscope rifles. The periscope rifle restored firepower to those posts where one dared not show one's face through a loophole, let alone one's head over the parapet. The Turks copied the weapon, although they did not make as much use of it.90
The widespread improvisation of items was a symptom of a larger problem with the supply system at Gallipoli. The whole campaign was characterised by scarcity of resources caused by shortages and incompetent administration. Official correspondent C.E.W. Bean noted that:
There existed a tradition - largely inherited from the old professional army - that the best quartermaster was one who, by slyness in manoeuvring within the regulations, could obtain for his unit more than its fair share.91
This practice is known as scrounging. Given the general atmosphere of scarcity, it should hardly come as a surprise that units scrounged, hoarded supplies, cannibalised equipment, stole from dumps and other units and even traded with the enemy.92
During the landing, the assault troops carried "iron rations": a bag of biscuits, tin of bully beef, and some tea and sugar. Thereafter, rations were delivered from supply ships to the 1st and 2nd Depot Units of Supply on the beach. The British Army's standard ration was used, which was not well suited to a hot climate and to Australian tastes was monotonous, salty and lacking in fresh fruits, meat and vegetables. In Egypt Australians had supplemented their rations with local purchases but this was impossible at Anzac although from 9 June the 1st Field Bakery supplied fresh bread from Imbros that was gratefully consumed. Although adequate in calories, the ration was deficient in vitamins B1 (Thiamine) and C, resulting in cases of beriberi and scurvy respectively.93
Army Standard Ration
|
|
| Preserved Meat | 452 |
| Bread (or biscuits) | 567(452) |
| Bacon | 113 |
| Peas or beans | 56 |
| Tea | 18 |
| Jam | 113 |
| Sugar | 85 |
| Cheese | 85 |
| Salt | 14 |
| Mustard | 1.4 |
| Pepper | 0.8 |
Fresh water was also a problem at Gallipoli. For the assault, water was supplied in petrol tins. By the second day sappers had sunk 20 shallow wells yielding 90,000 litres per day. During June the wells started to dry up and had to be supplemented by barges from Egypt which could be delayed by weather or enemy action, one being sunk on 22 June.95 The Field Service Regulations set one gallon (4.5 litres) per man per day as being sufficient for cooking and drinking, but even this was not met.96 At Quinn's Post, men received a third of it, at Pope's only a quarter. In July steel tanks were constructed and water piped to them from water lighters lying off beach but the pumping engine was old and unreliable. Problems continued to the end. On 8 October the pipes were damaged by a storm and on 30 November they froze and burst.97
A major project for improving the supply situation at Anzac was the construction of Watson's Pier, undertaken by the 1st Signal and 2nd Field Companies. Seventy metres long and 5 metres wide, the first nine bays were trestled and the remainder on piles. An unexploded Turkish 8 inch shell was emptied, refilled with shrapnel balls and used as a drop hammer in an improvised pile driver. The pier was completed on 27 June and was followed by four more. The piers allowed tugs to relieve steamboats of some of their work, but due to the fire of the Olive Grove Guns, only small craft could use the piers, and only by night.98
The other major logistical difficulty at Gallipoli concerned the medical arrangements. The MEF General Staff made inadequate provision for the numbers of casualties expected and failed to coordinate adequately evacuation arrangements. This debacle exposed some serious doctrinal problems. Medical arrangements were in the hands of the General or Administrative Staff. Indeed, ANZAC headquarters had no medical officer. For formations that did, it was unclear whether they were in charge of medical arrangements or merely to advise on them. Another problem, reflected in the organisation of medical units, was that British medical doctrine did not adequately address triage - the sorting of the wounded. Thus, hospital ships ("white ships") received many lightly wounded cases while too many seriously wounded cases were put on board transports ("black ships") which lacked the facilities to care for them.
However, the most serious medical problem of the campaign was that of sanitation and disease control. Shallow pit latrines as specified in the Field Service Regulations proved inadequate, and its warning about the danger of flies was ignored.99 Animal manure pits provided an excellent breeding ground for flies and by June Anzac was the centre of a fly plague. Due to the water shortage, mess tins frequently went unwashed. The packaging of the tinned rations, such as jam, also contributed. This set up a cycle whereby flies conveyed disease from the latrines to the men, who returned it back again. The result was a spectacular sickness rate. By September, 7.5 per cent of men at Anzac were being evacuated sick each week. The average stay in hospital was 52 days for the wounded, 46 days for dysentery and 29 for all sicknesses. Of the men still holding the trenches, 77 per cent were emaciated, 78 per cent had diarrhoea and 64 per cent had skin ulcers, known to the diggers as "Barcoo rot".100 Efforts to combat the problem by installing fly proof latrines were not complete until November by which time the problem had eased because the weather had become too cold for flies.101
Thus, the Gallipoli campaign was a logistical nightmare. There were also major tactical difficulties as well. Major and minor attacks at Gallipoli tended to confirm the inadequacy of offensive technology and tactics at the time.
One of the first of these after the landing was at Krithia on 8 May. The 2nd Infantry Brigade made a daylight advance under fire. As on 25 April, the British command favoured a daylight attack over a night one. In this they were simply going by the book, which said that:
A night attack may be justified as the only possible solution of a difficult situation, but when the conditions of the fire fight are likely to be favourable it will probably be better to accept the inevitable casualties that must result from a struggle for fire supremacy in preference to the undoubted hazards of a night attack.102
The chief lesson of this Australian version of the Charge of the Light Brigade was that such advances should be carried out at night when the enemy's capacity for location is diminished. A secondary lesson was the value of adequate preparation. The tactical issue, though, was that the offensive posture was under the prevailing conditions demonstrably inferior to the defensive even where there was manoeuvre room. At Krithia and even more spectacularly at the Nek in August, where two regiments of light horse were annihilated in an ill-advised charge, bravery served merely to run up a higher death toll.
On 19 May, von Sanders launched a major counterattack. He assembled 42,000 men to attack what he correctly estimated to be 15-20,000 Anzacs. His artillery was weak and ammunition short, so he relied on surprise. This was not achieved. The arrival of a fresh division was noted by the aviators even as it disembarked and it was bombed that afternoon. Word was passed down to the 1st Division.103 The result was one of the most one-sided battles in Australian history: 10,000 Turks killed or wounded while Australian casualties were 160 killed and 468 wounded. During the night 18 pounders expended 1,361 rounds, the howitzers 143, mountain guns 1,410 but the real damage was done by the rifles and machine guns, which fired 948,000 rounds.104 Such an enormous expenditure of ammunition relative to the number of casualties inflicted on the enemy was to become a feature of the new form of warfare.
A key part of the August Offensive was the attack on Lone Pine on 6 August. This attack was larger, more ambitious and more carefully planned than previous assaults. Maps of the enemy trenches were constructed from aerial photographs. A three day artillery bombardment was intended to cut barbed wire and damage the trenches but due to the shortage of shells only 28 guns were actually shelling Lone Pine, at most eight of them at any given time. However, the bombardment was surprisingly effective because the trenches were overcrowded in anticipation of the Australian attack and the overhead cover for protection against grenades and mortars increased the effect of howitzer shells.
The infantry attacked in waves from "secret saps" and the front fire trenches. Some units occupied the first Turkish trenches they came to while others pushed on to their final objective. The key role of Jam Tin bombs was recognised and a large supply taken, but not enough. Their use was not taught to reinforcements in Australia or Egypt and only 10 men per company were trained as bomb throwers.105 Three communications trenches were dug during the night that allowed prisoners and casualties to be evacuated and the position reinforced after dawn. The 4th Infantry Battalion sent its machine guns forward. Three were lost crossing No Man's Land but one opened on a communications trench packed with enemy troops, firing 700 rounds before it was silenced by a Turkish field gun. Turkish counterattacks caused heavy casualties due to overcrowding of the trenches, since a single bomb could take out an entire bay.106
The attack at Lone Pine cost the Turks 7,000 and the Australians 2,267 casualties. There was no technological difference between the Australian and Turkish Armies; both were equipped on a similar scale, with similar weapons. Based upon the battles of 19 May 1915 and Lone Pine - chosen on the basis of the availability of casualty information for both sides - a clear qualitative difference in effectiveness existed between the two sides, of about 4:1 in favour of the Australians.107 As to the problem of carrying through an attack under trench warfare conditions, it was clear that unless new technics and technologies were developed, trench warfare was going to be very costly and protracted.
Bulgaria's entry into the war on 14 October 1915 on the side of Germany and Austria opened land communications between them and Turkey. The first troops to arrive from Central Europe were an Austrian 24cm mortar battery on 15 November while the arrival of ammunition from Germany was first felt during an intense bombardment of the Lone Pine position on 29 November 1915. As the Anzac position had no depth, it seemed probable that overwhelming artillery fire, with or without an attack, would render the position untenable.108
The evacuation of Anzac was the most thoroughly and carefully planned operation of the entire campaign and by far the most successful. An elaborate deception plan prevented the enemy from realising that anything was amiss until the mines were exploded. Turkish units then occupied the craters and some Turks entered the Australian trenches to find them empty. Only at this point did the Turks discover the evacuation. Many tacticians then and since have pondered what the Turks could have done had they discovered that an evacuation was in progress. The defence of a position was no longer to be measured in men but in bullets and shells and right up until the last minute the firepower of the forward trenches was undiminished. The best response would have been to disrupt the evacuation by bombarding the beaches.
Gallipoli had been a school of modern warfare. New technologies had been introduced but none on a scale sufficient to have a major impact. Technics therefore continued to lag behind. Much had been learned but some things had not been learned well enough and much remained to be learned. In particular, despite Lone Pine, there were still no technics that could guarantee a successful attack on a fortified position. Next, would come the University of the Western Front.
Preface | Introduction | Chapter 1 | Chapter 2 | Chapter 3 | Chapter 4| Chapter 5 | Chapter 6 | Chapter 7 | Chapter 8 | Conclusion | Abbreviations | Bibliography
![]()
Page created by Ross Mallett
ross@metva.com.au
Last update 13 June 2001