On 30 May 1918 Lieutenant General John Monash took over command of the Australian Corps. At the same time, Brigadier General T. A. Blamey became the corps chief of staff. Two other Australian regular army officers held key positions: Brigadier General C. H. Foott as Chief Engineer (CE) and Brigadier General W. A. Coxen as GOCRA. The Australian Corps was now truly Australian. Monash brought with him a new model of the role of technology on the battlefield:
A perfected modern battle plan is like nothing so much as a score for an orchestral composition, where the various arms and units are the instruments, and the tasks they perform their respective musical phrases. Every individual unit must make its entry precisely at the proper moment, and play its phrase in the general harmony. The whole program is controlled by an exact timetable, to which every infantryman, every heavy or light gun, every tank and aeroplane must respond with punctuality; otherwise there will be discords which will impair the success of the operation and increase the cost of it.1
It was a thoroughly modern conception. The battle was expressed in terms of its socio-technological elements alone, the goal in terms of technological efficiency. This meme would prove well adapted to 20th century warfare.
A number of weapons were evaluated by the AIF at this time including the French 37mm gun, a demonstration of which was held on 28 May. The response was unfavourable. It was felt that the gun would not be any use against tanks unless armour-piercing ammunition was provided and that it was not mobile enough for open warfare. The Australian officers suggested that, if issued, it should be given to the Light Trench Mortar Batteries. The weapon was not taken up.2
Another new weapon was the Mark V tank. On his last day in command of the 3rd Division, Monash attended a demonstration of cooperation between tanks and infantry,3 and he was impressed with the capabilities of the new tank, which had 50 per cent more horsepower than the Mark IV and was faster, more manoeuvrable and more reliable than the earlier models.4 The new tanks were now being delivered in numbers and the War Office suggested that the AIF supply 750 men to form an Australian tank battalion but on Birdwood's advice, this was turned down, on account of the shortage of reinforcements.5
Monash invited Brigadier General A. Courage of the British 5th Tank Brigade to submit a plan for a tank attack on the high ground around Hamel. The plan he put forward was one with the tanks leading and the infantry mopping up behind. In subsequent conferences, much discussion focused on tactics, the proper relationship between tanks, infantry and artillery and in particular on whether to employ an artillery barrage and Blamey produced a paper listing the pros and cons. In this careful and open evaluation of armoured technology, the Australian Corps demonstrated a methodical approach capable of application to any new technology.
One method was to use tanks to replace the barrage. In its favour, this had the element of surprise and shock effect. Coupled with the likelihood of encirclement, a high number of prisoners might be captured. The infantry and armour would be mobile and flexible. Because the tank was mobile and had direct observation of targets on the battlefield, it could achieve acquisition and destruction of targets that could not be communicated to the artillery. Potentially, the tank could be an ideal weapon for an attack with unlimited objectives.6
The main argument against the tanks was their unreliability, as evidenced by the disastrous experience of the 4th Division at First Bullecourt in April 1917 and during the counterattacks at Dernancourt and Villers-Bretonneux, where they broke down and put in no-shows.7 This was a condition all too common with immature technologies. Trust and cooperation between infantry and armour could only be built up by training and successful operations.
The more conventional artillery barrage would enable the infantry to move into No Man's Land before Zero hour and escape the enemy counter barrage. Being visible, it could also guide the infantry along, preventing units from getting lost so long as they kept up with it. However, as also demonstrated at Bullecourt, the artillery could not guarantee that wire obstacles would be cut. Nor could it assure the infantry of quick victories over defended localities. It was slower, limited in range and expensive in ammunition.
In the Hamel operation, the critical limitations of the artillery barrage were minimised because the objective was a limited one, wire obstacles were few and ammunition was plentiful. The decision was therefore taken to use an artillery barrage, while assigning the tanks a subsidiary role. The use of tanks in combination with an artillery barrage was an innovation. Unlike at Bullecourt, however, the Corps staff did not leave matters to chance. Experiments were carried out to determine the best time for zero hour, given that the infantry would be on the tapes and in danger of discovery from ground or aerial observation, while the tanks could not operate effectively in the darkness.8
Extraordinary efforts were made to preserve the security of the operation. All vehicle movement in both forward and back areas was forbidden during the day and the 3rd Flying Squadron made a daily patrol to check on this.9 Batteries moved forward during the night to positions which had been previously prepared and camouflaged by the Corps engineers and sited by the British 5th Field Survey Section and the 1st Topographical Section. Of the 61 field and horse artillery batteries, 49 had to move and only one did so on the last night. A section per battery left behind in the old positions maintained the nightly harassing and interdiction fire as normal. 600 rounds of ammunition per 18 pounder and 500 rounds per 4.5 inch howitzer, a total of 132,000 rounds, were dumped at the battery positions by the 4th Division Ammunition Column and the Army Brigade Ammunition Columns. The batteries were forbidden to range, let alone fire, and all movement was forbidden in the battery positions during the day. However the gun crews did check that their gun platforms were level and sound and that their sights, clinometers and range dials were in working order. Wagon lines were concealed in the Somme River Valley and restrictions placed on the watering of horses.10
Security did not inhibit the 1st Topographical Section from producing a full range of maps and giving them wide distribution. Artillery target maps showing the location of all known enemy batteries were issued to all battalions and batteries and an enemy positions map to all company commanders. Aerial photographs were issued two per company and battery, and oblique photographs, which gave more of an infantryman's view, to all NCOs.11
The infantry attacked with ten battalions along a front of 6,000 metres or a density of 1.2 men per metre, considerably less than the densities deployed at Messines (3.8), Broodeseinde (5.4) or Passchendaele (4.1).12 A big difference of course was the lack of enemy pillboxes and extensive wire entanglements. It was hoped that tanks would substitute for the additional infantry. To spread the casualties more evenly, the 4th, 6th and 11th Infantry Brigades of the 4th, 2nd and 3rd Divisions were assigned, together with four companies of Americans from the US 131st and 132nd Infantry Regiments. In terms of depth, the attack was limited to a penetration of 2,500 metres, well within range of the field artillery. Monash, showing his rare, keen sense of the ground, set the objective as just over the next ridge beyond Vaire and Hamel Woods.
On 4 July the Australian and American infantry formed up on the tapes in four waves, with lines closed up. There was no preliminary bombardment, but a harassment shoot was carried out at eight minutes before zero and noisy FE2b night bombers flew low over the tanks in order to drown out the noise of their motors.13 All 60 tanks reached the start line on time.14 Over the previous days harassment shoots had been conducted with a mixture of smoke and gas.15 This time there was smoke only but it was hoped that the enemy would be fooled into donning gas masks, thereby restricting their vision and effectiveness.16
At Zero Hour, 0310, the barrage came down at full volume. There were three barrage lines. The first was from 18 pounders firing 60% shrapnel, 30% high explosive and 10% smoke. The 18 pounders were forbidden to use Type 106 fuzes as their greater area of effect would prevent the infantry from following the barrage as closely. The second barrage, 200 yards ahead, consisted of 90% high explosive with Type 106 fuzes and 10% smoke. The third barrage came from 80 6 inch guns and 20 8 inch and 9.2 inch howitzers. Altogether 326 field and 80 heavy artillery pieces were involved in the barrage, a density of 1 gun per 15 metres or about a third of that used at Third Ypres. The barrage was a slow one, 3 rounds per gun and 2 rounds per howitzer per minute, moving at a pace of 100 yards per 3 minutes up to the halt and then 100 yards every 4 minutes to the final objective. The remaining 202 heavy pieces were engaged in counterbattery missions using Type 106 and gas. They succeeded in silencing all but one 77mm battery,17 although the unregistered barrage inevitably led to a great deal of short shooting. The infantry reported that the barrage was ragged, caused a number of friendly casualties and prevented them from following the barrage closely.18
Additional smoke screens were provided by 4 inch Stokes mortars of the British 1st Special Company. As it turned out, the dry ground meant that the high explosive kicked up so much dust that the smoke was hardly necessary. To say that it could have been omitted, however, misses the beauty of the Hamel plan, which is that it would have worked under any weather conditions.19 A total of 147 Vickers machines were employed, 36 forward guns divided evenly between the three attacking brigades and 111 on the barrage. All told the forward guns fired 27,000 rounds, the rear guns, 399,000.20
Twenty Stokes mortars were assigned to the operation but the effectiveness of the Stokes had gone into declined due to a defective new propellant which did not explode properly, causing excessive flash, halved of the rate of fire from twenty rounds per minute to ten, and rendered the range charts unreliable.21 This eroded the faith of both the infantry and the mortar crews in the weapon.22 Worse still, because of the pronounced flash, the Stokes mortars attracted more than their fair share of enemy artillery fire.23
Hamel Village and other targets were bombed by night bombers the night before the attack and a series of enemy bivouacs and dumps were bombed on the day. The 3rd Flying Squadron's RE8s were engaged by the enemy air force 5 times but no Australian aircraft were lost.24 British squadrons supporting the operation lost 5 aircraft, while 5 German airplanes and a balloon were shot down.25
The infantry and armour pushed forward, following the barrage. Once clear of the enemy barrage the first two waves opened out to 50 metres apart while the remainder assumed artillery formation. Ten percent of the infantry was equipped with wire cutters, and in the few places where wire was encountered they used them to cut it, although this caused costly delays in places with the infantry losing the barrage and coming under machine gun fire. When the enemy was encountered, the Lewis gunners, working in pairs, used a version of the pre-war fire and movement tactics. One Lewis gunner firing from the hip would provide cover while the other set up to engage the enemy with aimed fired. Rifle grenades were also used to provide cover. When they closed with the enemy, Mills bombs and bayonets were used, Lance Corporal Thomas Axford of the 16th Infantry Battalion using them to kill 10 of the enemy and capture 6, for which he was awarded the Victoria Cross. When the infantry reached the final objective, they found foxholes already dug for them by the heavy howitzers.
Communications were mainly provided by 96 kilometres of D2 and D3 telephone cable. Despite the best efforts of the 3rd and 4th Pioneer Battalions, which concentrated on cable burying,26 only a fraction was buried in time. Due to the weak enemy artillery response, there were no breaks and the system worked perfectly, although a full range of alternatives had been provided for. Each FOO station consisted of 2 telephonists, 2 linesmen and 2 signallers and was equipped with 2 D3 telephones, 2 Lucas Lamps, 4 carrier pigeons and 800 metres of D2 cable. The 4th Division had practiced using visual communication daily, and a visual scheme was set up and tested but not used while only two carrier pigeons were released. A radio network was established and used and indeed was reckoned to be the fastest and most reliable means of communication. To save time, messages were sent in clear except for map coordinates.27
The value of the armoured support was enormous, and the assistance given by the carrier tanks exceeded all hope. Just four carrier tanks hauled up 5,670 kg of stores, estimated to have been the work of 1,250 men. This represented a saving not just in labour but in casualties as well, since these men were not brought under fire.
Because the 3rd Flying Squadron had its hands full, the RE8s of the British 9th Flying Squadron were assigned to resupply duty. Five dumps for small arms ammunition were established and marked with large white calico N's and eight aircraft delivered ammunition to them. Four aircraft were assigned to resupplying machine gun posts which could request resupply by putting out 'V's. Each aircraft carried two boxes, each containing 1,200 rounds. The battle area was only 30 minutes flying time from their airfield at Argenvillers, enabling aircraft to fly multiple sorties. In all, 93 boxes were dropped containing 11,600 rounds. Not all the boxes could be retrieved, but generally they landed within 100 metres of the target and one box landed within 3 metres of a post of the 6th Machine Gun Company. The effort was not cheap, with two aircraft lost. The utility of the air supply effort was debatable, but the validity of the concept was proven.28
The attack was spectacularly successful. Equipment captured included 2 77mm guns, 32 trench mortars and 177 machine guns and 1,605 prisoners were taken. The Australian and American infantry took 1,380 casualties.29
The Corps staff examined the Battle of Hamel closely looking for lessons and a number of conferences were held to discuss it. The first and most important lesson was that tanks could operate with an artillery barrage. At Hamel, they were able to follow the shrapnel barrage closely with only one tank being knocked out by friendly fire. This meant that in future, tanks could follow the barrage and the infantry would not need to follow it quite so closely, which promised reductions in infantry casualties both from friendly fire and the enemy reaction when the barrage lifted.
The heaviest casualties of the operation were suffered by the 15th Infantry Battalion in an assault on a position known as Pear Trench. Only 200 metres from the infantry jump off line, the tanks had not reached the infantry when the barrage lifted. More work clearly needed to be put into synchronising the infantry and armour as it was apparent in retrospect that the position could have been bypassed and mopped up later, but the infantry on the ground on the day had no way of knowing this.
An important lesson was the benefits of combined training between infantry and tanks. To facilitate this, a demonstration company was formed from the nucleus of the 15th Infantry Brigade.30 All infantry officers and senior NCOs in the corps attended demonstrations that showed how infantry and armour following a shrapnel barrage could attack a trench system, overcoming wire and strong points. The infantry could request assistance from the tanks with a helmet raised on a rifle and indicate strong points with coloured smoke. The tanks used flags to signal the infantry.31 By 8 August nearly every battalion of the 2nd, 3rd, 4th and 5th Divisions had taken part in practice attacks with the British 5th Tank Brigade.32
Hamel was more than just another victory like Menin Road. At Hamel the technologies had been reassembled to produce a new tactical system that showed promise of scalability, resulting in a deeper penetration that might yield still more spectacular results.
Before we turn to this extrapolation, it is worth contrasting the Battle of Hamel with the results obtained by peaceful penetration over the next two weeks, bearing in mind that Hamel was necessary precisely because the ground could not be captured by peaceful penetration. Two infantry brigades advanced 1,000 metres on a 4,500 metre front, losing only 437 men, representing about a third of the ground captured at Hamel for about a third of the cost, and indeed just 16 more casualties than the two brigades quietly holding the line near Hamel.33 In Peaceful Penetration, the Australian Corps had developed a second, unique, and in some ways equally devastating, tactical system.
In the wake of the Battle of Hamel, General H. S. Rawlinson, commander of the British Fourth Army, of which the Australian Corps at this time was the major part, saw a window of opportunity.34 The Germans were holding a long line that they had not had the time or the inclination to fortify and their reserves had been consumed in their offensives. Conditions were therefore conducive to a successful offensive and the Australian Corps was obviously an ideal instrument for it. The BEF commander, Field Marshal Sir Douglas Haig, arranged for the Canadian Corps to come down from the Arras sector to spearhead it.35
Monash told Rawlinson that an advance of 8,000 metres would be practical if the Australian Corps line was reduced to a two division front of 7,000 metres.36 This was duly arranged. Such a frontage was still more than double that used at Third Ypres, but shorter than Hamel, and seemed justified given good weather, poor enemy defences and the assistance of tanks. Furthermore, intelligence had located only one enemy reserve division in the path of the Australian Corps.37
Monash broke the problem down into two parts. At Messines, Third Ypres and Hamel, good tactics for capturing even immensely strong positions had been worked out. This made the capture of the first 2,700 metres a familiar task, carried out under the cover of an overwhelming artillery barrage. The second phase would have to be carried out beyond the range of the field artillery under semi-open warfare conditions. The infantry would then have to rely on the mobile firepower of the tanks and their own rifles, Lewis guns and rifle grenades.38
Considering the problem of keeping the infantry fresh over such a long advance, Monash called for leapfrogging by divisions. The 2nd and 3rd Divisions would capture the first objective, the Green Line; the 5th and 4th the second objective, the Red Line and if possible exploit still further to a final objective, known as the Blue Line. The names were taken, as in the 1917 battles, from the colours used to mark them on the maps. Monash recognised that a limiting factor in other operations had been the endurance of the troops detailed for the furthest objectives rather than the nearest, so the troops were disposed in reverse order to that in which they would enter the battle. This gave the first waves the longest march to the front line, but equalised the distance that all units would have to travel.39
There was another crucial difference between this battle plan and those of the Ypres battles of 1917. The bulk of the enemy forward artillery had been located in the Cerisy Valley, and Monash moved the Green Line forward to take it in. More gun positions were known to be behind the Red and Blue Lines, but even during the second stage the enemy would have to do without the support of forward guns.40
Tanks would be used on a lavish scale and the 2nd and 3rd Divisions were each given 27 Mark V tanks. When they had finished supporting those formations, they were to rally in the Cerisy Valley and go on to the final objective in support of the 4th and 5th Divisions, which also each had 18 of the new Mark V* tanks attached.41 The 2nd and 3rd Divisions were given three carrier tanks each while the 4th and 5th Divisions were given nine.42 The carrier tanks would be carrying a staggering amount of equipment. Monash reckoned each to be equivalent to 200 men.43 Moreover, the Mark V* tanks would each carry 15 men with 2 Vickers guns or 4 Lewis guns, or a total 20 Vickers guns, 32 Lewis guns and 270 men in all.44 As at Hamel, the noise of the tanks' approach would be drowned out by aircraft. Prisoner interrogations after Hamel had revealed that the harassing artillery fire used on that occasion had in fact alerted the enemy.45
To provide artillery support, the GOCRA, Brigadier General W.H. Coxen, had 18 field artillery brigades, 9 heavy artillery brigades and a long range brigade of 6 inch and 12 inch guns.46 During the first phase the whole of the artillery would act as in earlier set piece battles. There would be a barrage by 432 field and 30 heavy guns firing according to a detailed scheme while the heavies, two thirds of which were detailed for counter-battery tasks, bombarded the enemy gun positions and other targets. This represented a barrage density of 1 gun per 15 metres, about the same as at Hamel. Compared with the battles of 1917, the barrage was very simple: perfectly straight. It was hoped that this would minimise difficulties, since once again the barrage would be largely unregistered. Arrangements were made to have all guns recalibrated on the Army ranges and battery positions resected by the 1st Topographical Company.47
For First Objective |
For Second Objective |
|
Engineers |
1 field company |
2 field companies |
Field Artillery |
9 brigades |
6 brigades |
Heavy Artillery |
1 60 pounder battery |
|
Light Horse |
1 troop |
2 troops |
Pioneers |
2 companies |
2 companies |
Tanks |
27 Mark V |
27 Mark V |
On 28 July the direction of the wind changed. Previously it had blown strongly from the west and north west, making sound ranging difficult. Now it swung around, varying from east to south. Working day and night, the sound rangers meticulously recorded the location of every hostile battery. Visibility remained poor but a set of excellent aerial photographs was taken on 3 August.49 The artillery avoided shelling the newly located batteries, pretending that they had not been located. On the day, the heavy artillery opened on them all.50 The infantry noted that the enemy artillery's response to the attack was feeble and that it appeared to cease soon after the battle began.51
For the second phase, two batteries of 60 pounders would come under the command of the 4th and 5th Divisions respectively, and would advance with their field artillery. Both field and 60 pounder batteries would carry trench bridges, wire cutters, fascines and hurdles.52 As the infantry advanced to the Green Line and then to the Blue, batteries would start to fall out of range. As this happened, the 60 pounder and 6 inch howitzer batteries of six siege brigades would pack up and move forward, leaving the 8 inch and 9.2 inch howitzers behind, along with 2 guns of any 6 gun battery. In addition, four 6 inch guns would move forward to provide some long range capability.53 Because the final objective lay beyond the range of the field artillery, it was arranged for the air force to provide the smoke screens by dropping smoke bombs.54
A high priority was placed on getting roads repaired. Most engineers were pooled at Corps level,56 with the divisions cut back to one or two field companies and two pioneer companies. The heavy artillery was forbidden to use delayed action fuzes against the roads to prevent their being damaged. To help the heavy artillery move forward, the CRE, Brigadier General C.H. Foott placed the 1st Army Troops Company at the disposal of the heavy artillery.57
As in 1916, water supply was a major concern. A British army troops company was placed under the Chief Water Supply Officer and tunnellers were made available to repair and retest wells. Each division was allocated a 570 litre water truck, four GS water wagons with 1400 litre tanks, 4 hand pumps for deep wells and 4 windlasses with a bucket and 30 metres of rope,58 and every man was issued with an extra water bottle.59
The day of the battle, 8 August, was even foggier than usual. Units were relieved to find their assembly areas marked with lanterns, petrol tins with holes forming the battalion number.60 Broad tapes for guiding the tanks helped some units find their way forward and some units had white tapes to guide them to the objective as well, while many units used prismatic compasses to make their approach.61 Cooperation with the tanks was difficult during the first phase, because the fog made visual signally difficult.62
Thanks to their recent training, tactics were fairly standardised across the Corps. A feature of the Australian Corps was that responsibility for training lay with the corps, or more precisely with the AIF which was merged with Corps, rather than division, a factor which more than any other explains the uniform quality of the Australian divisions. The advance was led by scouts, who pointed out obstacles to the tanks which followed them in a line. The companies followed in a square formation, with platoons in single file. Some brigades attacked with three battalions and some with two. Light horse, trench mortars, cyclists and machine guns followed the infantry.63 As Monash had intended, all the available technologies were deployed, each to play its own part.
When opposition was encountered, usually from enemy machine guns, the tanks would approach the post directly while the infantry worked their way around the flank, and these tactics worked repeatedly.64 As units reached the Green Line and pushed beyond, they began encountering enemy 77 mm guns and 5.9 inch howitzers which not infrequently fired over open sights. Frontal attacks on enemy guns by tanks tended to be costly, but they were attacked successfully outflanked by teams of infantry and tanks working together.65
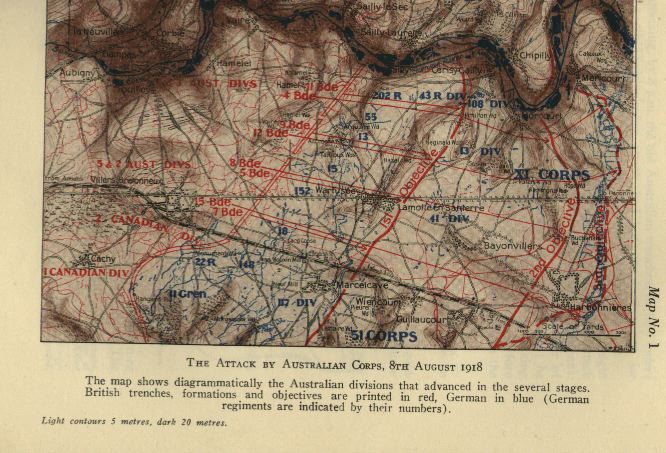
By 1120 the most successful battle of the war was virtually over. Except on the left flank where the failure of the British had exposed them to fire from heights overlooking the Somme Valley, the entire objective had been captured at a cost of about 2,000 casualties, with the Australians capturing 7,925 German prisoners and 173 guns.66 This represented half the total captures for the allies for about one tenth of the total casualties. Australian casualties from 7 to 14 August were 5,991,67 which may be contrasted with the Canadian Corps' 6,442 casualties on the first two days alone.68 The vast numbers of enemy guns and ammunition captured from 8 August 1918 onwards naturally led to the idea of firing some of it back at the enemy. The Australian Corps Heavy Artillery formed four special "Hun" batteries, one of which consisted of three 10.5cm howitzers manned by gunners of V Heavy Trench Mortar Battery.69
The only criticism of the Australians was that the advance did not go far enough. Cavalry and armoured cars were able to range beyond the Blue Line, the two divisions which had captured it still had uncommitted brigades, and the 1st Division had returned from the Lys sector. On the afternoon of the battle, Rawlinson ordered the advance to be continued the next day. This advance then took place in broad daylight with no barrage and no preparation and the tanks suffered severely from anti-tank guns and field guns firing direct.70
A spectacular example of the difference which good tactics could make was provided by six men of the 1st Infantry Battalion. Seeing a British battalion held up by German machine guns on the other side of the Somme River, they crossed the river and used fire and movement to outflank the enemy. In the process, they captured 300 Germans.71
The problems with using a natural feature like the Somme River as a corps boundary had now become obvious and Monash was placed in charge on both banks. He formed a new division sized force north of the river called the Liaison Force under the command of Brigadier General E.A. Wisdom, built around the 13th Infantry Brigade and the US 131st Infantry Regiment. The Liaison Force cleared up the Somme Valley by envelopment, cordoning off the peninsulas formed by the meandering Somme River. By now the Corps front had grown to 16,000 metres and rather than reduce it, Rawlinson gave Monash the British 17th Division. The argument that a corps consisting of more than four divisions would be unwieldy was completely forgotten. From now on seven would be normal. The British 17th Division was eventually replaced by the British 32nd Division and it in turn by the two divisions of the US II Corps.72
Contact with the Canadians brought an interest in Canadian ideas, but not their tactics or their infantry organisation of over strength battalions or even their machine gun units. Surprisingly, the Australians were interested in the organisation of the Canadian Corps' engineering units. In May 1918, the Canadians had disbanded their field companies, pioneer battalions and tunnelling companies and given each division an engineer brigade consisting of three battalions and a pontoon bridging transport section. The engineer battalions were quite large, 37 officers and 1,001 other ranks.73 The idea was to create an engineer arm not dependent upon infantry working parties. In semi-open warfare, much depended on the engineers restoring communications such as roads and railways. On 23 August six bridges were completed.74 There were also new tasks as well: on 2 September a new airfield was constructed for the 3rd Flying Squadron.75 Extensive use was made of captured dumps of German engineer stores.76 Chief Engineer Brigadier General C.H. Foott was very much in favour of reorganising the Australian engineers along Canadian lines and it had been something that the Australian commanders had been thinking about for some time, as the current engineer organisation of field companies and pioneer battalions had not been a success. Changes had not been made because it was thought that the British would not allow such inconsistencies between army organisational structures but given that approval had been given for the Canadians, there seemed to be no reason why approval would not be forthcoming. In the end the proposal died because after dissolving the existing units the Australian Corps would have been 250 officers and 5,388 short, impossibly large numbers to make up with reinforcements so scarce.77
Bridge Type |
Dismantled |
Erected |
| Foot | 10 |
12 |
| Horse Transport | 7 |
17 |
| Motor Transport, 8 tonnes | 4 |
27 |
| B Class, 14 tonnes | 2 |
8 |
| A Class, 17 tonnes | 4 |
17 |
| AA Class, Tank | 6 |
16 |
| TOTAL | 33 |
97 |
The Canadian engineers also had their own Mechanical Transport Company. Noting that the engineers were using 90 to 100 trucks per day, AIF Senior Mechanical Transport Officer Lieutenant Colonel W.H. Tunbridge recommended that a similar unit be formed for Australian Corps Troops Engineers.79 The idea had the support of Foott and Monash but also did not proceed, probably due to the cost of the trucks, which had to be paid for by the Commonwealth.80
This is not to say that there was a moratorium on the creation of new units. In July two new units, the 1st and 2nd Ordnance Ammunition Units, were formed and specifically charged with the role of investigating defective weapons and ammunition,81 and the Australian Corps workshops were Australianised. Additional ordnance personnel arrived from Australia in October and for a time, the workshops were double manned but then the British personnel were withdrawn and in November the 1st, 2nd and 3rd Ordnance Mobile Workshops were created, the last units of the First AIF to be formed in the Great War.82
The Australian Corps pushed forward, switching to peaceful penetration whenever things slowed, and launched a series of set piece attacks. The Germans retreated under pressure, attempting a stand wherever they could. One operation in particular stands out: the capture of Mont St Quentin. In this battle, the 3rd Division seized a minor bridgehead over the Somme. Monash then threw the 2nd Division across and sent it to capture the dominating heights of Mont St Quentin. Without help from tanks or an artillery barrage, the under-strength 60 to 70 strong companies of the 5th Infantry Brigade managed to capture the feature. A German counter-attack threw them off again. Meanwhile, Brigadier General H.E. Elliott of the 15th Infantry Brigade led his men across the Somme at Peronne in person.83 In hard fighting, the 6th Infantry Brigade captured Mont St Quentin and the 15th Infantry Brigade cleared Peronne.84 At a cost of 3,000 casualties, the Australian Corps defeated five German divisions and helped trigger a general withdrawal to the Hindenburg Line on 6 September.85 The battle stands out among those of the AIF on the Western Front as one of manoeuvre rather than a set piece and one fought out with infantry weapons, the grenade, rifle grenade, Lewis gun and bayonet.
The role of the Australian Corps in 1918 was a remarkable one. Comprising only 9.5% of the BEF, it captured 18.5% of the German prisoners, 21.5% of the territory and 14% of the guns captured. This represented an effectiveness 1.95, 2.23 and 1.47 times that of the British Army average.86 These victories came at a cost: 14,116 Australian soldiers became battle casualties on the Western Front in August, the AIF's third most costly month of the war, 8,348 in September and 3,070 in October for a total of 25,534. This was still considerably less than the 29,843 in the Somme fighting of July and August 1916, or the Passchendaele fighting in September and October 1917 when 32,979 men were lost, or even the fighting at Bullecourt and Messines in April, May and June 1917 when there were 26,495 casualties and the results were immensely greater.87 The casualties were more or less matched by 25,000 German prisoners taken; that many more Germans were killed or wounded is certain but their numbers are not known. Certainly, some 623 square kilometres of France was recaptured from the enemy.88
Bringing the war to this successful conclusion was due in no small part to the successful integration of new technology, organisation and tactics into a combination that could truly breach any defensive system. In this the AIF played a significant part, especially in the final year of war, both in the development of new tactics and technics and in their successful employment on the battlefield.
| Action | Divisions |
Prisoners |
Guns |
Frontage (m) |
Advance Depth (m) |
Area Captured (km2) |
| 27 March - 7 August 1918 | 2,3,4,5 |
3,500 |
- |
14,000 |
2,500 |
31 |
| Amiens 8 August 1918 |
1,2,3,4,5 |
7,925 |
173 |
8,000 |
11,000 |
75 |
| Proyart-Bray 9-22 August 1918 |
1,3,4,5 |
1,127 |
6 |
11,000 4,000 |
2,500 5,000 |
41 |
| Chuignes 23 August 1918 |
1 |
3,092 |
21 |
10,000 |
3,000 |
26 |
| To Peronne 24-29 August 1918 |
2,3,5 |
584 |
5 |
16,000 |
13,000 |
207 |
| Peronne / Mont St Quentin 30 August 1918 - 4 September 1918 |
2,5 |
1,666 |
6 |
7,000 |
4,500 |
26 |
| 5-17 September 1918 Peronne to the Hindenburg Line |
3,5 |
1,948 |
- |
10,000 |
17,000 |
148 |
| Hindenburg Line 18 September 1918 |
1,4 |
4,506 |
86 |
8,000 |
5,000 |
33 |
| To Beaurevoir Line 19 September 1918 to 4 October 1918 |
2,3,5 |
3,057 |
35 |
6,000 |
12,000 |
62 |
| Montbrehain 4 October 1918 |
2 |
1,250 |
- |
3,000 |
2,500 |
5 |
| TOTAL | 28,655 |
332 |
654 |
Preface | Introduction | Chapter 1 | Chapter 2 | Chapter 3 | Chapter 4| Chapter 5 | Chapter 6 | Chapter 7 | Chapter 8 | Conclusion | Abbreviations | Bibliography
![]()
Page created by Ross Mallett
ross@metva.com.au
Last update 14 June 2001